3 Ways to Compress Video Files on Mac
Everyone finds a high-resolution video appealing because of its detailed content. But with smartphones continuing to support high-definition video recording, many users are beginning to worry about how to store and share large video files.
Abstract;
- Everyone enjoys watching high-quality videos until they start taking up too much storage space or until you want to share them.
- The easiest solution for this on a Mac is to compress video files to reduce their size and make the content easier to share and store.
- As will be covered below, there are several ways to Compress Video Files on Mac, depending on how you want to do it.
Compression is the best solution to this problem if it seems to be bothering you frequently on a Mac. A video file can be compressed to Its size, which has been greatly reduced, making it simpler to share or save on your Mac.

Here are all the Mac methods for compressing video files.
Method 1: Use QuickTime to Compress Video Files on Mac.
MacOS pre-installs a media player called QuickTime. You can use it to play multiple media on your Mac as it supports multiple audio and video file formats.
Additionally, you can use QuickTime Player as an editor and perform many operations on your video files, including compression.
To use QuickTime Player on a Mac to compress a video file, follow these steps:
On your Mac, launch QuickTime.
To compress a video, open the folder containing the video. After choosing the video, click the Open button.
From the menu bar, click File, then Export As. From the list of options, select the output video resolution you want
.
Mac QuickTime Player’s export option
Give the file a name, select the export destination folder, then click Save in the Export window
.
Allow QuickTime Player to export the video file while you relax. The output resolution you choose will determine how long the export takes. After the export is complete, you will have a compressed file in MOV file format.
Method 2: Use iMovie to Compress Video Files on Mac.
One of the most used Mac video editors is iMovie. It allows you to perform various tasks, such as compressing videos, applying filters, adding effects, and trimming videos.
iMovie is especially better than QuickTime Player for compressing videos because it gives you more control over the process. Not only can you set the resolution with iMovie, but you can also choose the compression speed and quality.
iMovie also has the advantage of allowing you to see the expected file size of a video clip based on the compression parameters you choose at the time of compression.
Here’s how to compress a movie file on Mac using iMovie.
Launch iMovie.
Select Import Media by clicking File in the navigation bar.
Using the Finder, select the video file you wish to compress, then choose Import Selected.
To take the video you just imported, click it.
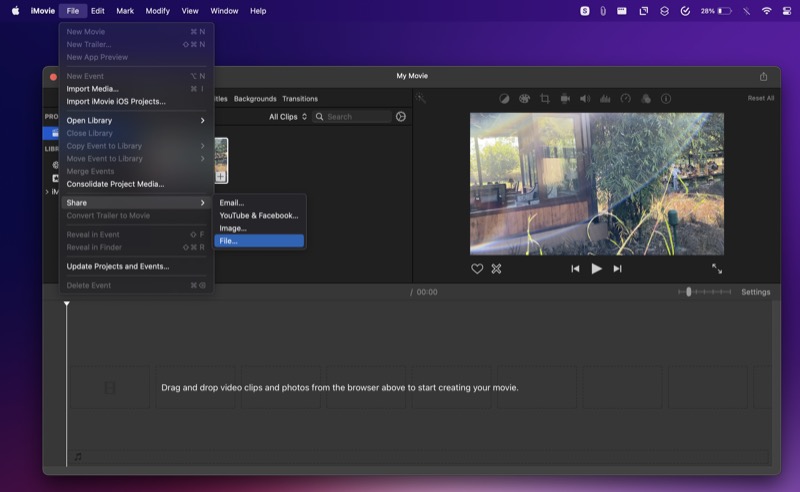
Go to File from the menu bar, then choose Share > File.
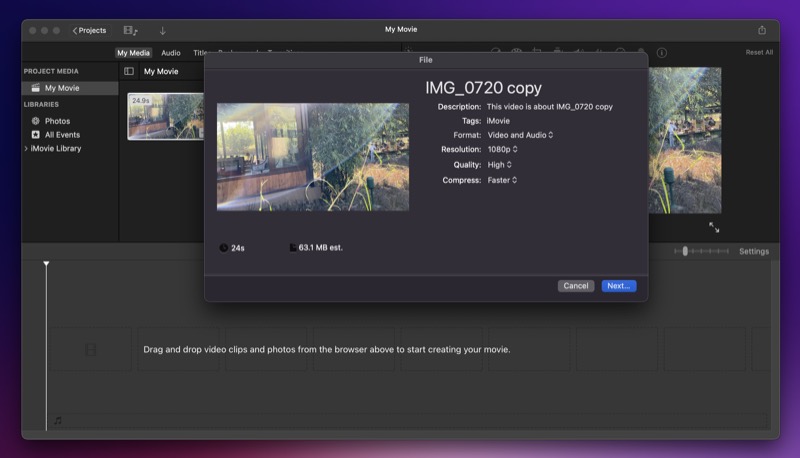
Choose your choice by clicking the menu button next to Properties on the Share window. We recommend adjusting the Resolution, Quality and Compress parameters to better manage the compression of files.
iMovie will display the final file size and the amount of time it took to compress the clip after you’ve adjusted the compression settings to your liking. If you are satisfied, click Next.
Give the file a name, choose an output location, then click Save to start the compression process at the Save prompt
.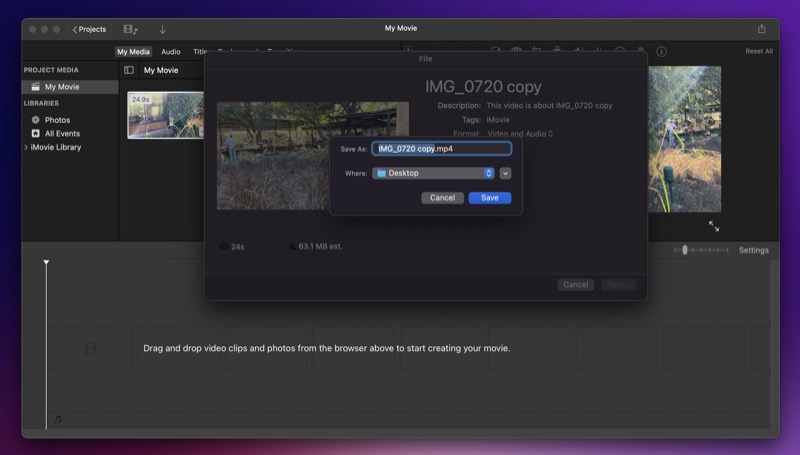
iMovie will output the video file as a .MP4 file after compressing it according to the settings you selected. An MP4 file is more compatible with a wider range of media players and platforms than a MOV file, which QuickTime Player only plays on Apple devices.
Method 3: Use third-party Apps to Compress Video Files on Mac.
As you have already seen, if you just want to reduce the size of a video clip, QuickTime Player is the easiest way to compress a video file on a Mac. However, iMovie is a better alternative if you want a bit more control over compression, as it lets you choose the compression speed and quality for the final clip.
However, neither of these two applications provides as many options and control over compression properties as third-party tools for video editing and compression, such as VideoProc Converter. To give you more control over the size and quality of the compressed video clip, you can select the frame rate, bitrate encoder, dimensions, and resolution for compression on a few popular third-party Mac video editors.
Additionally, there are online video compressors that can handle the compression process for you if you’re up for it yourself.
Four popular third-party apps are most commonly used for Mac video file compression: VideoProc Converter, Handbrake, VLC, and Claudio.
1) VLC
Another popular open-source and free media player available for Mac is VLC. Many people are not aware that it can also be used to compress video files.
Like Handbrake, VLC gives you control over many areas of compression, including bitrate, resolution, video codec, and codec.
2) Clideo
Clideo is an online video compressor, so you don’t need to install any software to use it on your Mac. With just a few simple clicks On your Mac, you can use it to swiftly reduce the size of video files.
To use Clideo for video compression, all you have to do is upload the required video (less than 500MB), and the software will take care of the rest. After the compression process is complete, the video can be downloaded to your Mac.
3) HandBrake
The most widely used open-source video transcoder for Mac is called Handbrake. With its wide codec compatibility, it can be used to convert practically any kind of video file.
Handbrake’s built-in device presets, custom frame rates and encoders, video filters, and batch processing are some of its key features.
4) VideoProc Converter
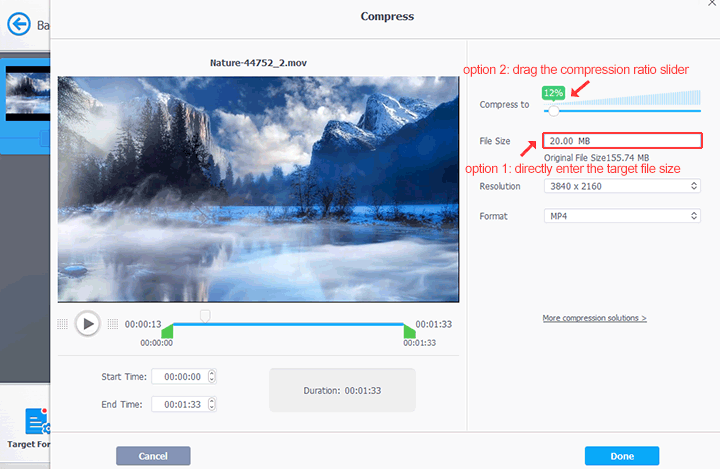
Users of VideoProc Converter can quickly and easily reduce the size of video files in seven easy steps. The easiest and most efficient way is to import your video file and set the target size. You can compress videos to the exact size using this option.
Additionally, you can change various video features, such as the resolution, which ranges from 4K to 1080p or 720p. Videos in highly compressed HEVC/H.265 format can also be converted to H.264 format. To further reduce file size, you can also adjust GOPs (groups of pictures) for slow-motion or high-speed videos, reduce frame rate and bitrate, and adjust audio codecs.
Additionally, videos can be compressed up to 47 times faster while maintaining the best quality and the smallest file sizes thanks to Max Quality’s compression engine and GPU hardware acceleration.
Let’s see how to use VideoProc Converter to compress video files to your desired size:
1: After opening, drag your video files to the “Video” section of VideoProc Converter.
2: In the toolbox, select “Compress”.
3: Select the compression ratio or target size, then click “Done.”
4: To start compression, click “Run.”
Other Mac Video Compressors You Can Use to Reduce Video Size:
If you want more control over compression and want more advanced control, you can check out these two popular video compressors in addition to the techniques and tools mentioned above.
Easily Share and Store Videos on Mac
Compressing videos is the simplest approach to lowering their file size and facilitating sharing and storing them on your Mac. A movie with a smaller file size is easier to attach to an email or messaging program, requires less bandwidth when transferring it online, and takes up less space on your computer.
Some of the best ways to compress video on Mac are mentioned above. Thus, you can choose a strategy to accomplish the task based on the method and purpose for which you want to compress your file.
ALSO READ:
- Best VPN Browsers
- Free Movie Apps
- Free Android VPNs
- Random Video Chat Apps
- Drawing Apps for Android
- Reminder Apps for Windows
- Firefox Extensions
Compress Video Files on Mac FAQs
On a Mac, how can I compress a video clip without sacrificing quality?
With the exception of RAW videos, most videos are compressed in some way. In fact, the compression process itself is to blame for the degradation of quality.
Having said that, you can still compress the video to a modest compression level to prevent noticeable pixel loss from affecting the overall image quality.
On Mac, how can I reduce the MB size of a video?
There are a few methods available to reduce the MB size of video on Mac. Most of them have some degree of compression. If you don’t want to use compression, you can still effectively reduce the size of your movie by trimming it at the beginning and end, especially if there are silent parts in those areas.
As an alternative, if you don’t mind compressing the movie, you can use any of the aforementioned methods to lower the file size.
On a Mac, how do you determine the size of a video?
When you click a video clip on a Mac, the video size is displayed. To do this, launch Finder and navigate to the folder you want to resize. Finder will display the size of the selected video file in the preview window on the right when you click on it.
Alternatively, you can use MediaInfo to get more details about a video file. This is a paid program that displays every detail of an audio or video file, including bitrate, format, and codec, as well as color space, sample rate, compression mode, and more.