What Does SOS Only Mean on iPhone and 11 Ways to Fix It
When anything goes wrong, we often use our phones to find solutions—calls or Google searches. But what if something goes wrong with your phone? What should you do if you can’t fix only SOS or SOS messages on your iPhone? Now, let us help you with these simple fixes.
No, you have not accidentally turned on the setting. In fact, you are only able to dismiss SOS from the iPhone status bar. How? Keep reading to find out all the solutions.
WHAT DOES SOS ONLY MEAN ON IPHONE
The most straightforward reason is that you are not in the coverage region. If there’s a problem with your iPhone’s cellular network connection, you’ll either see,
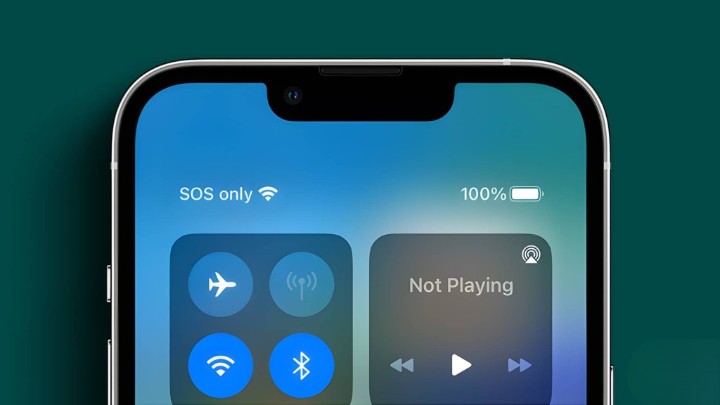
- A status bar error indicating No Service or Searching, or
- In iOS 16, an SOS or SOS only appears in the top-right corner; in iOS 15 and below, it appears in the top-left corner. (Only accessible in Australia, Canada, and the United States)
You can’t utilize cellular data, send or receive texts, or make or take phone calls, according to both choices. You can, however, phone 911 or the relevant authorities and utilize the emergency SOS service.
WHY DOES MY PHONE SAY SOS ONLY
Your iPhone may be unable to exit SOS mode because of
- ineffective or flawed network coverage.
- Issues with carriers
- The SIM card is either broken or otherwise damaged, or it is not inserted correctly.
- An iOS bug.
- The aircraft is in the air.
Let’s proceed to the SOS only mistake repairs now that we are aware of the typical reasons.
HOW TO GET RID OF SOS ONLY ON IPHONE
1) Move to a Place With Better Network Connectivity
You are unable to resolve SOS on iPhone only if you are in a place where there is no network connectivity. The only option is to relocate or find a location with better connectivity.
If, on the other hand, you live in a place with reliable coverage, or if friends or family can contact you, please try the following instructions to disable SOS exclusively on your iPhone.
2) Turn Off and On Cellular Data
A network issue could be the reason why your iPhone just gets stuck in SOS mode. Additionally, cellular data tries to establish a new connection when you disable and then enable it, which largely resolves the issue.
Step 1: Select Cellular/Mobile Data under Settings.
2) Turn off mobile and cellular data.


3) Toggle Cellular Data / Mobile Data after a short delay.

Alternatively, you can launch Control Center by tapping the icon and disabling cellular data. After a few seconds, tap it to activate it.


If the top status bar on your phone still shows “SOS,” move on to the next patch.
3) Enable Data Roaming
Disabled data roaming feature can only cause SOS on iPhone. Thus, if you are traveling, make sure this setting is set before continuing.
Step 1: Open Settings → Mobile/Cellular Data.
2) Select Mobile Data Options or Cellular Data Options.
3) Turn on data roaming.


With any luck, 4G or 5G will appear in the status bar instead of SOS.
4) Switch to 4G or LTE
Globally, 5G is still in the early stages of development, which may affect your connection and signal strength. So, if this problem persists, it is advised to disable 5G on your iPhone and stick with 4G.


5) Restart to Fix SOS Only on iPhone
The troubleshooting methodology that has received the most attention and references. Surprisingly, it mostly benefits us too. Resetting caches basically fixes any bugs or configuration issues, enables a reliable network connection and resolves the current issue.
- For an iPhone with Face ID: Press and hold both the side button and the volume up/down buttons at the same time until the power-off slider shows. To turn off the phone, slide.
- For iPhones with Touch ID: Holding down the side button will bring up the power slider screen. To shut down the device, drag the power slider.

To restart the device after it turns off, press and hold the Power button.
6) Update Carrier Settings
These carrier-provided options are intended to enhance overall performance and cellular connectivity. On iPhone, carrier settings can be updated manually in addition to updating automatically most of the time.
But first, let’s make sure your smartphone is turned on for cellular data and connected to a reliable Wi-Fi network before we show you how.
Step 1: Select General under Settings.
2) Press the “About” button.


3) To install an update, click Update in the pop-up window that appears if available.
If you are configuring an eSIM or have recently done so, you may need to download the updated carrier settings manually.
After updating, the network bars should return to the status bar. If not, proceed to the next step.
7) Disable and Enable Automatic Network Selection
This setting allows for a reliable network connection by ensuring that you are connected to the correct network (carrier). You can specifically turn off SOS on the iPhone and turn it back on, which forces the gadget to re-establish its network connection.
Step 1: Select Cellular/Mobile Data under Settings.
2) Select Network Selection.
3) Turn off the automatic switch by flipping it.


4) Toggle it again after a while.

8) Re-Insert SIM
Although it is rare, the original SIM card can interfere with network connectivity. You can just get rid of SOS on your iPhone by doing a simple reset. So, remove the SIM card from your iPhone, turn it back on, and then put the SIM card back in.
Note: You will need to reset the eSIM to reset it, so avoid doing this unless instructed by the carrier.
9) Update iOS
A software bug may be the reason you’re seeing the SOS icon. Thankfully, a simple OS upgrade will take care of everything. Thus, check if an update is available, then install it.
Step 1: Select General under Settings.
2) Choose Software Update
3) Click Download and Install if available.


10) Reset Your Network Settings
Try the final troubleshooting step if the previously mentioned solutions failed to resolve SOS only on iPhone. Why is it ultimate?
Due to the fact that it would remove any saved Bluetooth devices, VPN setups, Wi-Fi passwords, and more. So, before using this strategy, make sure you have all the relevant information written down.
Step 1: Select General from the Settings menu.
2) Choose “Transfer or Reset iPhone” by scrolling down.
3) Click Reset at this point.


4) Select Reset Network Settings and, if requested, input the passcode.
5) To finalize the process, tap Reset Network Settings once more.


11) Contact your Carrier
Nearly every aspect has been addressed. But, only your carrier can assist you if SOS or SOS alone is still displayed next to the Wi-Fi symbol. So give them a call and let’s get this resolved.
Notably, they will advise you to repeat these actions at first, so be sure to let them know about your previous troubleshooting attempts. If attempting this doesn’t result in any positive outcomes, consider reaching out to Apple Support for assistance.
ALSO READ:
- Portable Projectors
- Image Recognition Tools
- Social Media Keyword Research Tools
- Funny AI Memes
- How to Google Search by Circling
- Hilarious Tech Memes
- Best Encrypted Messaging Apps
YOUR GUIDE TO FIXING SOS ONLY ON IPHONE
Are you wondering if this problem and Apple’s most recent Emergency SOS via Satellite calling function have anything to do with each other? Both a no and a yes is the response. No, since the functionality is exclusive to the iPhone 14 series (and possibly above).
And the answer is definitely affirmative, since there’s a good chance the compatible iOS 16 changed some of your iPhone’s settings by accident. With any luck, these fixes enabled you to disable SOS exclusively.